
Wait, That Shape Looks Familiar…
Kingdom Hearts III, as a Disney and Final Fantasy crossover, leans quite heavy on the Disney for this installment of the series, and it introduces a whole bunch of Pixar properties into series canon (as well as a full length performance of “Let It Go” from Frozen!). With this emphasis on Disney comes 90 hidden Mickeys to find in various worlds, known in game as “Lucky Emblems.” If you find all of these symbols, you will receive the “Hidden Kings” achievement, as well as a slew of other rare items, including an Orichalcum+, which is required to craft the Ultima Weapon. You’ll also unlock a secret ending for the game! Here’s how to find all 90 Lucky Emblems in KH3.


Olympus Lucky Emblems
There are 12 Lucky Emblems to find in Olympus.
Olympus Lucky Emblem #1
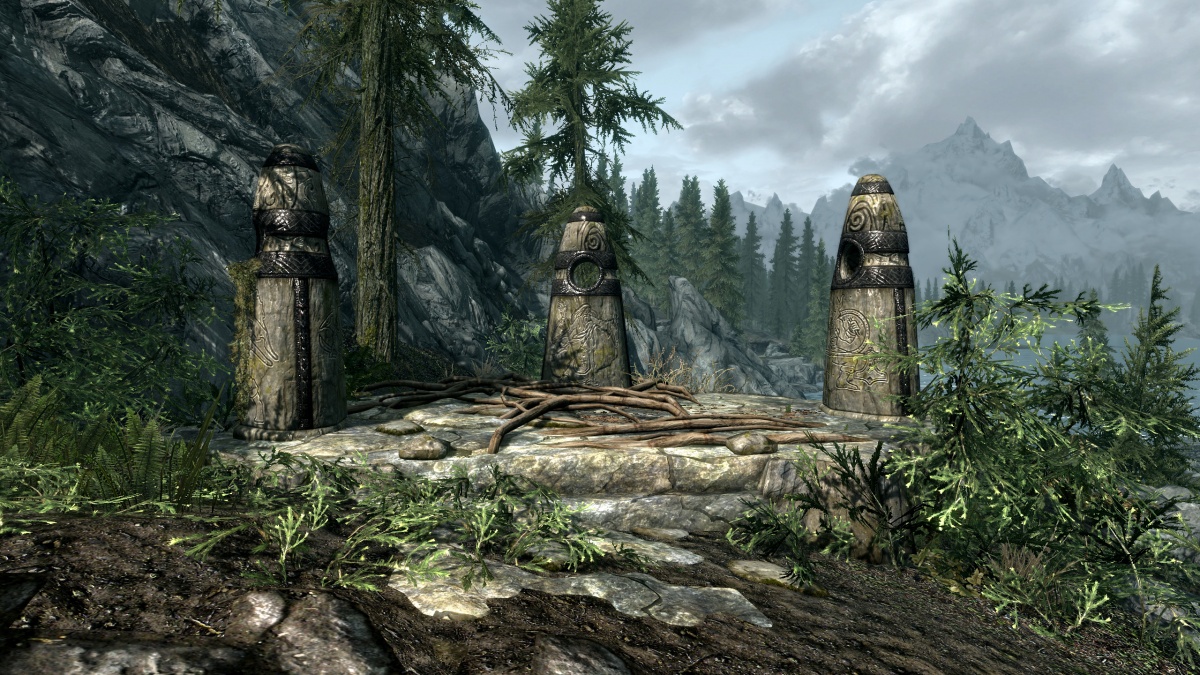
Start at the Thebes Overlook save point, then head down the stairs and over to the red rooftops, and jump down to the open area with the three pillars and the statue with the shield. The Lucky Emblem is on the northeast wall by the stairs.
Olympus Lucky Emblem #2
Start at the Garden save point, and then head downhill until you enter the Big Olive. Cross the area where there used to be a large chasm full of fire to reach the Agora. Next, go left, and then go left again, into the path full of rubble that you had to Trinity Sled through. The lucky emblem will be around the corner on the back of the big rock in the middle of the path.
Olympus Lucky Emblem #3
For this lucky emblem, start at the Agora save point. Head straight from the save point towards the building with two green banners on it. The lucky emblem is on the stairwell to the right.
Olympus Lucky Emblem #4
Go to the Overlook save point, and take the stairs up behind it. You will see the lucky emblem on the wall when you reach the top of the stairs, by some cypress trees.
Olympus Lucky Emblem #5
From the Agora save point, go to the mountain area and make your way past the river and up the first cliff. Instead of continuing up the path to the right, head up the left side towards the big archway. Once you are by the big archway, turn around, and you’ll see the lucky emblem on one of its pillars.
Olympus Lucky Emblem #6
Start at the Agora save point, and then turn around and head into the mountain area. Head through the river area, and climb up the first two cliffs. Continue up the path on the right, and you will see a waterfall on the cliff ahead. The lucky emblem is on the right side of it.
Olympus Lucky Emblem #7
Continue up the path from #6, and you will eventually reach a large cave opening. There is a path on the left, take it and you will be able to see the lucky emblem on a mesa if you look over the cliff.
Olympus Lucky Emblem #8
Start at the Summit save point, and head down to the dark and stormy area. Pass the first divide in the path and jump down the really tall cliff. Head down the path until you see a tree on your right. The vines on the tree form the lucky emblem.
Olympus Lucky Emblem #9
From the Corridor save point, head up the stairs to the northeast, and then stop before you take the rail slide. The lucky emblem is on the side of a staircase to the right of it.
Olympus Lucky Emblem #10
From #9, continue on the straight rail to the left of it and enter the next room. The lucky emblem is hidden behind the breakable pots across the room from you.
Olympus Lucky Emblem #11
For #11, go back to the staircase where you found #9, and take the curving rail slide to the right instead. Turn right and fall down the waterfall to land in the Secluded Forge. The lucky emblem is on the side of the anvil.
Olympus Lucky Emblem #12
From the Corridor save point, go west and take the rail slide up to Cloud Ridge. Go upstairs from where it drops you off, and you’ll see the lucky emblem in a cloud formation in the distance.


Twilight Town Lucky Emblems
Twilight Town has 9 lucky emblems for you to find.
Twilight Town Lucky Emblem #1
The first lucky emblem you find in Twilight Town is on the wall to the left of Huey, Dewey, and Louie’s shop. Although you take a picture of it for story purposes, the game doesn’t count it as found until you take another picture of it afterwards.
Twilight Town Lucky Emblem #2
For the second lucky emblem, get on top of the tram and look down on its roof.
Twilight Town Lucky Emblem #3
Go to the Moogle shop and climb onto the roof, and then up onto the tallest pillar. Look down to see the lucky emblem on one of the other pillars.
Twilight Town Lucky Emblem #4
In the northeast section of the Tram commons, you’ll find a movie theater. Wait for the movie to stop playing, and then look at the screen to find the lucky emblem.
Twilight Town Lucky Emblem #5
Climb the building across from the entrance to the movie theater, and then look down on the other side. You’ll see three plates arranged on a table in a lucky emblem.
Twilight Town Lucky Emblem #6
When you get to the woods through the Underground Conduit, turn around and look at the doors for the passageway you just came out of. It will be on the right door.
Twilight Town Lucky Emblem #7
Climb the wall to the left of the doors where you found #6. You’ll find this lucky emblem as soon as you reach the top.
Twilight Town Lucky Emblem #8
Look for a large log on a hill on the east side of the woods. The lucky emblem is on the side of the hill beneath it, formed by patches of sunlight.
Twilight Town Lucky Emblem #9
Go to the Old Mansion and look at the outside wall to the left of the gate to find your final lucky emblem in this world.


Toy Box Lucky Emblems
There are 11 lucky emblems to find in the Toy Box.
Toy Box Lucky Emblem #1
Climb up the bookshelf to the left of the door in Andy’s room. The lucky emblem will be stamped on the side of a light blue metal tin.
Toy Box Lucky Emblem #2
Head out the window from Andy’s room and use the pink trampoline on the ground to jump onto the roof of Andy’s house. The lucky emblem is carved into a roof tile right where you will land.
Toy Box Lucky Emblem #3
Go to the front door of Andy’s house and turn around like you’re leaving the house. The leaves in front of the door make a lucky emblem.
Toy Box Lucky Emblem #4
Across the street from Andy’s house, you’ll see a silver van parked. Look next to the license plate (which reads A113!) to find the lucky emblem.
Toy Box Lucky Emblem #5
From the Galaxy Toys Main Floor save point, head right and jump onto the checkout counters. The lucky emblem is made of rolls of tape, and it’s located on the back wall of the checkout area.
Toy Box Lucky Emblem #6
For this lucky emblem, you’ll need to hijack a Gigas, because you’ll need its shooting capabilities. Go to the north end of the main floor, and shoot the toy display right behind the gumball machine. The lucky emblem will be in the middle of the circular base.
Toy Box Lucky Emblem #7
Enter the Lower Vents from the action figure store on the second floor. Follow the path up to the big fan that blows you upwards. Land on the first landing, not the second one, and turn around to look back at the fan area. The lucky emblem will be on the vent wall.
Toy Box Lucky Emblem #8
Start at the third floor save point and head to the closed store on the east labeled “Lovely Party”. Jump over the seats here over the railing onto the spaceship. The lucky emblem is on the spaceship’s hatch.
Toy Box Lucky Emblem #9
Enter the Babies and Toddlers: Dolls area on the third floor. Go to the Julia doll display by the counter and climb to the top. Look back over at the counter and you’ll see that from the right angle, the disco balls form a lucky emblem.
Toy Box Lucky Emblem #10
From the third floor save point, go to the southeast corner of the map and look at the robot statue’s base to find this lucky emblem.
Toy Box Lucky Emblem #11
From the Galaxy Toys Main Floor save point, head outside the entrance and turn right. There is a lucky emblem on the boxes there.


Kingdom of Corona Lucky Emblems
There are 9 lucky emblems in the Kingdom of Corona.
Kingdom of Corona Lucky Emblem #1
Climb up Rapunzel’s tower and face southeast towards the waterfall. To the left of the waterfall, three rocks make up a lucky emblem.
Kingdom of Corona Lucky Emblem #2
Start from the Marsh save point, and follow the right wall, past the Corona sign. When you see a lit-up nook, turn right to see the lucky emblem on the wall.
Kingdom of Corona Lucky Emblem #3
From the Campsite save point, enter the Wetlands area and make your way up to the cave. It will be easier to get here if you haven’t completed the world yet, but it will still be accessible after, although you might need the superjump ability to reach some areas in this world. Look for some barrels on the left side as you enter the cave. You will see a lucky emblem on one of them.
Kingdom of Corona Lucky Emblem #4
From the Wildflower Clearing, slide down the hill until you reach the Shore. Go to the bridge and look at the right side of the bridge wall as you enter. A lucky emblem sits on the end of the wall.
Kingdom of Corona Lucky Emblem #5
Inside the kingdom area, look at the left of the second archway you encounter, next to the bored man with the purple hat, to find a lucky emblem.
Kingdom of Corona Lucky Emblem #6
For this lucky emblem, go to the mural of Rapunzel with her birth parents, and go down the alleyway to the left until you see a big wooden gate. It’s on the left door.
Kingdom of Corona Lucky Emblem #7
In the wharf, there is a short round tower. Look by the door to find your next emblem.
Kingdom of Corona Lucky Emblem #8
At the southern end of the wharf, take a left by the bottom of the stairs to see barrels in a Mickey shape.
Kingdom of Corona Lucky Emblem #9
For your last lucky emblem in this world, climb the lighthouse in the wharf and look inside the basin in the center.

Monstropolis Lucky Emblem #1 
Monstropolis Lucky Emblem #2 
Monstropolis Lucky Emblem #3 
Monstropolis Lucky Emblem #4 
Monstropolis Lucky Emblem #5 
Monstropolis Lucky Emblem #6 
Monstropolis Lucky Emblem #7 
Monstropolis Lucky Emblem #8 
Monstropolis Lucky Emblem #9 
Monstropolis Lucky Emblem #10 
Monstropolis Lucky Emblem #11
Monstropolis Lucky Emblems
There are 11 lucky emblems in Monstropolis for you to find.
Monstropolis Lucky Emblem #1
In the Laugh Floor, count desks from the entrance until you reach desk number 7. Look at the clipboard, and you’ll see that someone drew a Mickey symbol.
Monstropolis Lucky Emblem #2
In the Laugh Floor, beat up the clown toy by the entrance until you can move it, then look at the spot where it was sitting to find a lucky emblem.
Monstropolis Lucky Emblem #3
Start at the save point in the Door Vault’s upper level, and take the rail slide course. When you finish, you can find the lucky emblem in a dead-end hallway on the right.
Monstropolis Lucky Emblem #4
From the Factory basement save point, go through the white door to get to the Door Vault. Take the brown door to the far left once you reach the big wall of doors, and then go through the tunnel to find the banana flan. Look at the wall of doors behind the flan, and you’ll see the lucky emblem in yellow.
Monstropolis Lucky Emblem #5
Start at the Factory ground floor save point. Instead of going in the elevator, head down the path to the right of it. At the end of the next room, you’ll see the lucky emblem on the wall next to some stairs.
Monstropolis Lucky Emblem #6
In the room with the Factory ground floor save point, look for some large paint canisters. The lucky emblem is spray-painted on the ground in pink.
Monstropolis Lucky Emblem #7
From the Factory ground floor save point, take the elevator up. Keep following the path until you see a yellow staircase. Go in the hallway to the left with the conveyor belt, and then look right. At the end of the hallway, there is a lucky emblem on the wall.
Monstropolis Lucky Emblem #8
Go to the Power Plant accessway save point. It is literally right in front of you on the side of a light blue cabinet.
Monstropolis Lucky Emblem #9
Start at the area where you found #8, and head down the brick hallway until you go outside. Follow the path until you go inside another indoor hallway, and then turn around and look back as you head outside again. The lucky emblem is on top of the doorway.
Monstropolis Lucky Emblem #10
From the Tank Yard save point, find the CDC agent in the yellow suit, and climb up the boxes behind him. Then jump onto the yellow platform, and look to the right to see a lucky emblem made of pipes.
Monstropolis Lucky Emblem #11
Start at the Service Yard save point, and head east to the power plant. Take the stairs up and see what the CDC agent is looking at over the railing.


Arendelle Lucky Emblems
Arendelle has 11 lucky emblems for you to find.
Arendelle Lucky Emblem #1
Begin your search for this lucky emblem at the Gorge save point. Take the winding path south down the mountain, but at your first opportunity, jump off the cliff to the left, onto a platform with a treasure chest and a bunch of trees. The lucky emblem is on the tree furthest from the chest.
Arendelle Lucky Emblem #2
Start from the Gorge save point, and take the elevator behind the portal down into the Middle Tier. Follow the path up until the first fork in the road (left into a room or straight up some stairs). Take a left into the room and climb the ice blocks onto the bridge in the middle of the room. At the end of the bridge, there’s a lucky emblem.
Arendelle Lucky Emblem #3
At the Lower Tier save point in the ice maze, climb up the cliff behind you, and go to the end of the path to find this lucky emblem.
Arendelle Lucky Emblem #4
From the Gorge save point, take the portal into the maze, and then take the railing ahead of you to the elevator. Ride the elevator down, and then take another railing to the next area. Head up the stairs, and then go right. As you’re crossing the bridge, look to the right, and you’ll see a Mickey on the wall.
Arendelle Lucky Emblem #5
Start at the Gorge save point and take the portal into the maze, then use the grind rails to get to the room in the northwest that’s full of ice pillars. Hop up the big center formation, and you should see a lucky emblem if you face north and look down.
Arendelle Lucky Emblem #6
Start at the Mountain Ridge save point, and start going down the mountain on the path to the south. Before you jump off the cliff, however, turn on the last bend to see the lucky emblem behind you.
Arendelle Lucky Emblem #7
At the ice palace, there’s a small cave to the northeast. Head inside and follow the path, keeping right. Eventually, you’ll go down a steep hill into an area with very tall snow-covered trees. You should see a climbable wall to your right. Climb up to the east of the bumped out, rounded ledge on the map, and then slide down the rocks to your right to land on the rounded ledge. The lucky emblem is made of snow and it’s on the wall.
Arendelle Lucky Emblem #8
From the ice palace, go through the northeast cave, and then look for a bunch of spiky ice formations surrounding some big rocks. The lucky emblem is on the one that you see right before the path goes downward.
Arendelle Lucky Emblem #9
Start at the Snowfield save point, and then follow the path until you fall off a cliff. Straight ahead, there’s a really tall wall to climb. Go up there, and then look to the right to see the lucky emblem imprinted on top of a rocky snow-topped pillar.
Arendelle Lucky Emblem #10
Start at the Foothills save point and continue up the path until you reach a wide-open field. Stay on the left side, and you should see some stacked logs. Look at the ends to see a lucky emblem.
Arendelle Lucky Emblem #11
From the Foothills save point, turn around and head downhill into the area that had the strong winds and large rocks for shelter. The fourth rock you pass will have a big lucky emblem on its back.


100 Acre Woods Lucky Emblems
In the 100 Acre Woods, there are only 3 lucky emblems to find.
100 Acre Woods Lucky Emblem #1
Look out at the path facing away from the treehouse, and you should be able to see a Mickey topiary in the distance.
100 Acre Woods Lucky Emblem #2
Go around the huge pumpkin by the scarecrow in Rabbit’s vegetable garden, and you should see the lucky emblem on the back of it.
100 Acre Woods Lucky Emblem #3
Go to Rabbit’s laundry area, to the left of the tree house, and look in the empty bucket to see a lucky emblem.

San Fransokyo Lucky Emblem #1 
San Fransokyo Lucky Emblem #2 
San Fransokyo Lucky Emblem #3 
San Fransokyo Lucky Emblem #4 
San Fransokyo Lucky Emblem #5 
San Fransokyo Lucky Emblem #6 
San Fransokyo Lucky Emblem #7 
San Fransokyo Lucky Emblem #8 
San Fransokyo Lucky Emblem #9 
San Fransokyo Lucky Emblem #10 
San Fransokyo Lucky Emblem #11
San Fransokyo Lucky Emblems
San Fransokyo has 11 lucky emblems for you to find.
San Fransokyo Lucky Emblem #1
In Hiro’s garage, look at the wall to the right of the door to see a lucky emblem made of coiled hoses.
San Fransokyo Lucky Emblem #2
During the day, head to the south district save point. Head up the incline and climb to the top of the sushi chef statue, then look down in front of you. You should see three red bushes making a Mickey symbol.
San Fransokyo Lucky Emblem #3
This lucky emblem can only be seen at night. Start at the South District save point and climb John’s Fashion Center right behind you. Look towards the building with the “M” on it and you will see the Mickey made out of lights on the Tsukiji Delicatessen sign.
San Fransokyo Lucky Emblem #4
From #3, climb up the “M” building and look west at the statues holding fans. One fan has a lucky emblem on it.
San Fransokyo Lucky Emblem #5
For this lucky emblem, visit during the day and follow the freeway up north from the sushi chef. Take the right exit up to an area with 4 lanes, and head west. There will be a small building with a dome on its roof to the north. The lucky emblem is on the side of the dome.
San Fransokyo Lucky Emblem #6
Look for a really tall building that is surrounded by fans in the Central District during daytime. Climb to the very top, and you’ll find the lucky emblem on the round floor area next to a fan that blows you upward.
San Fransokyo Lucky Emblem #7
From #6, face east and look for a fan with a black, red, and blue pattern on it. Airstep onto it, and then airstep again onto one further out with the same pattern. This one has a lucky emblem on top.
San Fransokyo Lucky Emblem #8
In the daytime, head to the North District save point. Go through the parking lot to the north and into the park area past it, and then go left. Past the end of the park area, you can see a stairwell with a giant Mickey on it.
San Fransokyo Lucky Emblem #9
From the park area near #8, you can jump directly up to reach the monorail track. Go into the tunnel a ways, and then look back, and you should see the lucky emblem lit up on the tunnel wall.
San Fransokyo Lucky Emblem #10
From #9, continue through the tunnel, and then jump down to the alleyway to the right (north). Look for a yellow car, and you’ll see the lucky emblem on its side.
San Fransokyo Lucky Emblem #11
For this one, go to the top of the really tall building above the monorail tunnel. You’ll have to shotlock onto the highest point without falling off. The lucky emblem is on top of the lightning rod.

The Caribbean Lucky Emblem #1 
The Caribbean Lucky Emblem #2 
The Caribbean Lucky Emblem #3 
The Caribbean Lucky Emblem #4 
The Caribbean Lucky Emblem #5 
The Caribbean Lucky Emblem #6 
The Caribbean Lucky Emblem #7 
The Caribbean Lucky Emblem #8 
The Caribbean Lucky Emblem #9 
The Caribbean Lucky Emblem #10 
The Caribbean Lucky Emblem #11 
The Caribbean Lucky Emblem #12 
The Caribbean Lucky Emblem #13
The Caribbean Lucky Emblems
There are 13 lucky emblems for you to find in the Caribbean.
The Caribbean Lucky Emblem #1
From the save point on Port Royal’s docks, look to the right and you’ll see an old green rowboat in the water. Jump on it to see the lucky emblem.
The Caribbean Lucky Emblem #2
From the Docks save point, go into town and go all the way down the street to the left until you see a building with a bunch of crates inside. Destroy those crates to reveal the lucky emblem.
The Caribbean Lucky Emblem #3
On the beach in the Seaport area you’ll see a hut. Look at the crates inside to find a lucky emblem.
The Caribbean Lucky Emblem #4
From #3, go up onto the pier and look up at the hanging sign to see a lucky emblem on it.
The Caribbean Lucky Emblem #5
From the Fort save point, head up top and climb up to the British flagpole. Then look down to the right and you’ll see a lucky emblem made of rope on the ground.
The Caribbean Lucky Emblem #6
Start at the Fort save point and go down into the prison area, and enter the 3rd cell with a ball-and-chain on the ground. On the back of the ball is the lucky emblem.
The Caribbean Lucky Emblem #7
For this lucky emblem, start at the Isla Verdemontana, and climb your way up the path through the jungle. You’ll eventually come to a cliff facing the sea. Look down in the water to see the lucky emblem made of rocks.
The Caribbean Lucky Emblem #8
Sail to the Isle of Luck and climb the tallest rock formation, then look at the other rocks to see a lucky emblem.
The Caribbean Lucky Emblem #9
At Horseshoe Isle, look at the inside of the rocky arch to find this lucky emblem.
The Caribbean Lucky Emblem #10
There is a small island to the west of Isla de los Mastilles. Look for three barrels in the sand that form a Mickey shape on this island.
The Caribbean Lucky Emblem #11
Go to Ship’s End and anchor your boat, then go on land and cross to the other side of the island. There is a half-sunk shipwreck with a lucky emblem on it sticking out of the water.
The Caribbean Lucky Emblem #12
On Sandbar Island, climb the big rock formation to the south, and you’ll find a lagoon in the middle. Look east and you’ll see a large Mickey-shaped cavern.
The Caribbean Lucky Emblem #13
#13 is right next to #12, in the same lagoon. Look for it on top of some green coral.
What Rewards Can You Get From Photographing Lucky Emblems?
| Number of Lucky Emblems You’ve Found | Prizes |
|---|---|
| 1 | AP Boost |
| 3 | Mega-Potion |
| 5 | Expert’s Ring |
| 10 | Thundara Trinket |
| 15 | Moon Amulet |
| 20 | Magic Boost |
| 25 | Star Charm |
| 30 | Ribbon |
| 35 | Buster Band+ |
| 40 | Strength Boost |
| 45 | Master’s Necklace |
| 50 | Wisdom Ring |
| 55 | Defense Boost |
| 60 | Orichalcum Ring |
| 65 | Cosmic Belt+ |
| 70 | Royal Ribbon |
| 80 | Orichalcum+ |
| 90 | Mickey Clasp, “Hidden Kings” Achievement, Secret Ending Unlocked |


Leave a Reply